Systematic analysis of geometric inaccuracy and its contributing factors in roboforming

The geometric form error in incremental forming is the deviation between the formed and the intended part profile. This geometric inaccuracy is primarily observed at the (a) unsupported regions adjacent to the active deforming area in the sheet due to the bending and (b) deformed section of the part (wall region). The geometric error in the deformed region (\(\delta R\)) is caused by (i) machine compliance (\(\delta _c\)), (ii) springback (\(\delta _s\)), and (iii) tool compliance (tool (\(\delta _t\)) and tool holder(\(\delta _th\)) ). Since all these deviations are small enough in practice, we can use their superposition to estimate the profile geometric error:
$$\beginaligned \delta R = \delta _c +\delta _s +\delta _t + \delta _th \endaligned$$
(1)
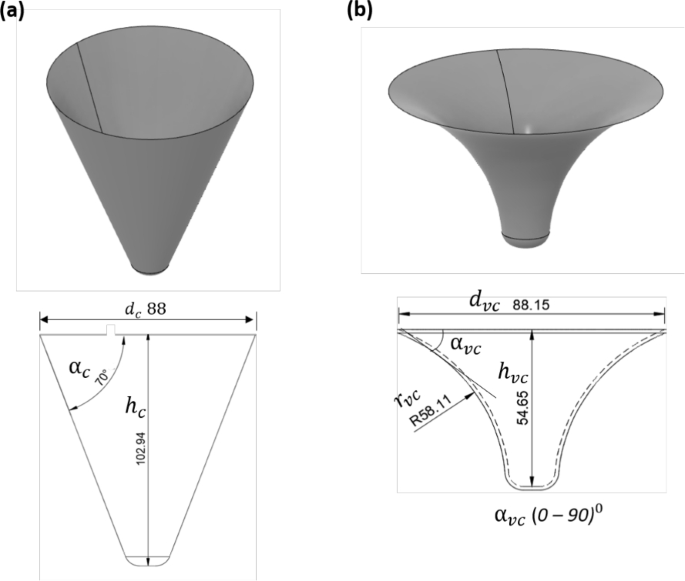
This work proposes a methodology to analyze individual contributions to forming profile deviations due to the above-mentioned factors in roboformed technological operations. Two different workpiece profiles were used both in CNC and robot-based incremental forming (Fig. 2). Both parts, i.e. variable wall angle conical frustum (VWACF) and constant wall angle cone (CWA) induce a unique load condition for geometric deviation study.

Geometries of designed parts for SPIF along with corresponding 2D sketch: (a) Cone (b) Variable wall angle conical frustum (VWACF), (all dimensions are in mm).
The experimental setup is shown in Fig. 3. Consistent forming conditions, i.e., toolpath, tool diameter, lubrication, blank size, and material, were maintained in both cases (CNC and Roboforming). Incremental forming (ISF) experiments were carried out over a ‘Jyoti Huron KMill’ CNC machining centre and an IRB7600 ABB robot with 500 kg payload capacity; using AA1050 blanks of dimension 150 mm \(\times\) 150 mm \(\times\) 1.2 mm. A simple sheet metal fixture with a work area (100 mm \(\times\) 100 mm) was used, as shown in Fig. 3. Hydraulic oil was used for lubrication. The tool was maintained normal to the fixture plane for the entire period of ISF. The fixture ensures a rigid constraint to prevent material ‘draw-in’ during incremental forming. Hydraulic oil provided sufficient lubrication to minimize the interface friction during forming. A simple ball end tool with a 10 mm diameter was used with a constant feed rate of 750 mm/min. A step toolpath with a constant 0.5 mm step depth was used. A six-axis FT Omega191 Force/Torque sensor (mounted at the robot flange) with a maximum load capacity of 9000 N in the z-direction ) and a Kystler multi-component dynamometer with max \(F_z\) of 1000 N was used to measure forces and torques during roboforming and CNC-based incremental forming respectively (Fig. 3). Both the sensors were synced to the same frequency of data logging for consistency in force comparison and post-processing.

Experimental setup used for conducting ISF tests.
The formed components were scanned using a laser scanner (HEXAGON|8325-7 with RS5) with 25 µm accuracy. The scanned components were compared with the nominal CAD profiles to estimate overall profile errors in each case.
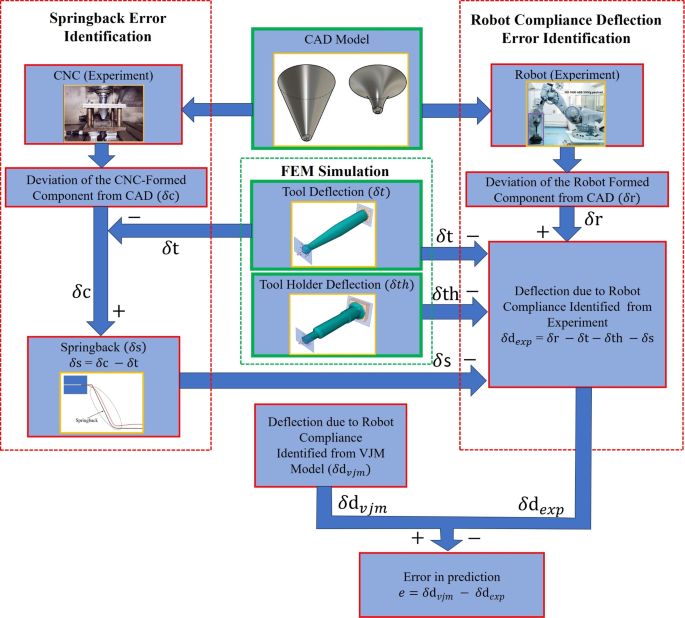
The proposed methodology estimates the overall deviations in the roboformed component by comparing it with the nominal CAD profile; it also isolates the error due to springback, tool deflection, tool holder deflection, and robot compliance. The deviation due to tool holder and tool deflections are estimated using static FE analysis. The springback is estimated from the experimental observations of deviations in CNC-formed components. Due to the considerable stiffness gap between CNC and robots25,33,34, the deviations in CNC-formed components are assumed to be mainly due to springback after reducing the numerically estimated tool deflections. The error due to robot deflections (robot compliance) is deduced experimentally and validated using the virtual joint method. The steps indicating the individual treatment of each parameter for the estimation of deviations are presented in Fig. 4. The details of each step are thoroughly discussed in the following subsections.

Proposed methodology for estimating individual deviations.
Roboforming setup
The actuation of the forming tool is achieved through the relative motion of the machine’s linkages and joints. The position of the tool in space is described relative to a defined reference coordinate frame. In the context of the roboforming setup, several such reference frames are located. A schematic of all the reference coordinate frames to be defined in ISF is shown in Fig. 5. The \(O_b\), \(O_e\),\(O_t\), \(O_h\),\(O_w\), and \(O_f\) are the origins for the robot base, end effector, tool, work object, and force sensor coordinate frames, respectively.

Schematic representation of all the coordinate reference frames in roboforming.
All the experimental measures (deviations and forces) in ISF are obtained with respect to the work coordinate frame with the origin assigned to the center \(O_w(0,0,0)\) of the sheet metal blank, as shown in Fig. 5. \(\,_j^i\textbfT\) denotes the transformation of measured parameters (forces, moments and displacements) from reference frame i to j (the transformation matrices and steps followed are presented in supplementary information Appendix (A).
In the ISF process, the forming tool moves along a pre-defined toolpath generated for a target geometry. The tool axis is aligned perpendicular to the sheet plane (xy-plane), as shown in Fig. 6. For a spherical tool with a constant radius, the moment experienced by the tooltip varies due to the shifting contact location on the part profile. In the incremental forming process, different tool-tip profiles may be used based on the complexity of the part profile35. Therefore, the tool and the part profile may influence the moments developed at the forming tool (see Appendix A). Here, the forming forces at each point (\(\textbfp(x,y,z)\)) along the toolpath are estimated by transforming the forces and moments (\(\textbfF_f,\textbfM_f\)) recorded using a dynamo-meter (make: Kystler) placed under the fixture (Fig. 3) to the tooltip (\(\textbfF_e, \textbfM_e\)) using the transformation steps discussed in the Appendix A.

Illustration of forming tool, force sensor, workpiece base frame and their coordinate system and corresponding transformations.
Stiffness model of robotic setup
The entire roboforming setup can be modeled as a serial arrangement of rigid components, including the tool and the tool holder. The effective compliance (\(\textbf k_ef\)) of the entire assembly is defined in a common reference frame (here, tool tip reference frame (\(O_t\))) by :
$$\beginaligned \textbf k_ef^-1 = \textbf J_r^T\textbf k_r^-1 \textbf J_r + \textbf J_th^T\textbf k_th^-1 \textbf J_th + \textbf J_t^T\textbf k_t^-1 \textbf J_t \endaligned$$
(2)
where \(\textbf k_t\) and \(\textbf k_th\) are the tool and tool holder compliance obtained by FE analyses. \(\textbf J_r,\textbf J_th\) and \(\textbf J_t\) define the transformations from the local coordinate systems to the \(O_t\). Corresponding transformations can be computed using the following matrix expression:
$$\beginaligned \textbf J_i = \beginbmatrix \textbfI_3\times 3 & (\textbfv_i \times ) \\ \textbf0 & \textbfI_3\times 3 \endbmatrix_6\times 6 \endaligned$$
(3)
where I is \(3 \times 3\) identity matrix, 0 is \(3 \times 3\) zero matrix and \((\textbf v_i \times )\) transforms vectors \(\textbf v_i\) into skew-symmetric matrix for \(i=\t,th,r\\). Corresponding vectors \(\textbf v_i\) are given in Table 1.
The compliance matrix \(\textbf k_ef\) is identified based on the experimental force and deflection data measured during roboforming experiments. Similarly, robot compliance (\(\textbf k_r\)) can be derived using the following expression:
$$\beginaligned \textbf J_r^T\textbf k_r^-1 \textbf J_r = \textbf k_ef^-1 -\left( \textbf J_t^T\textbf k_t^-1 \textbf J_t +\textbf J_th^T\textbf k_th^-1 \textbf J_th \right) \endaligned$$
(4)
While the tool is designed to follow a predetermined path, the deflections or errors in its position change at different locations due to the changing loads on the tool. The recorded reaction force and moments at the fixture base are transformed to the tool contact point for estimating the deflections. The estimated global tool (\(\textbf k_t\)) and tool holder (\(\textbf k_th\)) compliance matrices (Table 2) are used to calculate the corresponding deflections in ISF during forming. The detailed methodologies for all stiffness parameter identification from simulation and experimental studies are presented in the subsequent sections.
FEA-based approach for identification of tool and tool holder deflection
The roboforming tool assembly consists of two components: the forming tool and the tool holder (Fig. 7), both with varied cross-sections and material properties. It is necessary to determine the compliance of the tool assembly during the roboforming. In this regard, the individual stiffness matrix of the forming tool (\(\textbf K_t\)) and tool holder (\(\textbf K_th\)) are determined using a static finite element analysis (FEA). The details of the FE model setup and boundary conditions are given in Fig. 8. The tool and tool holder are modeled using C3D20R solid elements. The tooltip surface nodes are coupled to a reference node defined by the tooltip using Kinematic coupling constraints. The trial forces and moments are applied to the reference node. The displacements at the base are constrained.

Schematic of the forming tool (a) dimensions (mm) and (b) segments consisting of tool and tool holder.
The FEA methodology is based on identifying corresponding nodal displacements for a set of external forces and moments. Distributed surface force and moments are applied at the tool hemispherical ball end (Fig. 8) to approximate the contact conditions at the tool-end during forming. The nodal displacements of the deformed tool are extracted for a set of surface nodes at the tool end, as shown in the Fig. 8. To effectively reduces the inaccuracies associated with local deformation of the nodes, the methodology proposed by36 is employed. The proposed methodology involves considering a displacement field around the reference point. The displacement field was defined for the nodes surrounding the ball end of the tool Fig. 8, and node displacements were treated as rigid transformations with displacement vector \(\textbfp\) and rotational displacement \(\mathbf \delta \phi \) represented by a rotation matrix \(\textbfR\):
$$\beginaligned \textbfp_i + \Delta \textbfp_i = \textbf R(\delta \phi ) \textbfp_i + \textbfp, \quad i = \overline1,n \endaligned$$
(5)
where the initial location of the node is \(\mathbf p_i\), and \(\Delta \mathbf p_i\) represents the node’s displacement due to the applied wrench for the n number of considered nodes.

FE analysis for tool (a) and tool holder (b) with boundary conditions for stiffness identification (figures are not to scale, enlarged for clear depiction).
To find a set of desired parameters, a least squares optimization is used for the error function f:
$$\beginaligned f = \sum _i=1^n \Vert \,\textbfp_i + \Delta \textbfp_i – \textbf R(\delta \phi ) \textbfp_i – \textbfp\,\Vert ^2 \rightarrow \min _R, \textbfp \endaligned$$
(6)
This leads to the orthogonal Procrustes problem37 and involves the minimization of the sum of squared residuals and singular value decomposition in order to identify the translational and rotational parameters within a distinct set of virtual experiments. Further, an indicator for the parameter-to-noise ratio38 was adopted to assess the impact of errors introduced by mesh distortion and round-off error. This indicator was derived from covariance analysis of the translation and rotation parameters, and the estimation accuracy was evaluated using a common confidence interval technique. The procedure is presented in detail in the work by Klimchik et al.38.
Wrench vectors (force and moment) in virtual experiments differ in the direction of application to develop a complete compliance matrix (Table 2, supplementary information Appendix C). The deflections and rotations are assumed to be relatively small, and the stiffness \(\textbf K\) represents a linear relation between the three-dimensional static forces/moments F=\((F_x,F_y,F_z)^T\), M = \((M_x,M_y,M_z)^T\) and the corresponding translations/rotation displacements \(\varvec\delta \)=\((\delta _x,\delta _y,\delta _z)^T\), \(\varvec\theta \)=\((\theta _x,\theta _y,\theta _z)^T\). \(\textbf K\) is the \(6\times 6\) stiffness matrix and the inverse of \(\textbf K\) is called the compliance matrix (\(\textbf k\)), defined as ([\(\textbf k\)]=[\(\textbf K]^-1\)).
A similar procedure is followed to identify the stiffness matrix of the tool \(\textbf K_t\) and tool holder \(\textbf K_th\).
Robot deflection modelling
This section describes an approach for computing the Cartesian stiffness and robot deflection using an analytical model. In order to evaluate the stiffness of the robot, a lumped model called the Virtual Joint Model (VJM) is used39. According to this model, certain virtual joints are introduced in the joint space to describe the control loop and joint/link flexibility38. The following relation represents the transformation from the base to the tool of the robot.
$$\beginaligned \textbfT=\textbfT_\mathrm \textbfBa\textbfse\left[ \prod _i=1^6 \textbf T_\textrmjoint^i\left( q^i+\theta _\textrmjoint^i\right) \textbf T_Link^i\right] \textbfT_\textrmTool \endaligned$$
(7)
Here, \(\textbfT_Base\) represents the transformation from the base of the manipulator to the first actuated joint, and \(\textbfT_Tool\) represents the transformation from the flange to the tool. Transformation of the flexible actuated joint is represented by \(\textbf T_joint^i(q^i+\theta _joint^i)\) where \(q^i\) and \(\theta _joint^i\) are the joint and virtual joint variables. Link geometry is described by \(\textbf T_Link^i\). In the VJM model, flexible links are replaced by a combination of rigid links and virtual joints39.
Studies show that for heavy industrial manipulators, joint elasticity dominates link elasticity40. The effective stiffness of the robot, which is generally defined by the Cartesian stiffness matrix \(\textbf K_c\), depends on joint and link stiffness. The Cartesian stiffness matrix of the robot can be expressed as a lumped stiffness of joint space stiffness \(\textbf K_\theta \) according to the following relation41:
$$\beginaligned \textbf K_c = \textbf J_\theta ^-T \textbf K_\theta \textbf J_\theta ^-1 \endaligned$$
(8)
Here, \(\textbf J_\theta \) is the configuration-dependent Jacobian of the robot, describing the mapping between Cartesian and joint spaces. The configurations ( joint angles \(\theta _1\) to \(\theta _6\) ) of the robot corresponding to each Cartesian coordinate location on the toolpath are retrieved from the robot controller. \(\textbf K_\theta \) corresponds to the joint stiffness matrix. The impact of configurations on the accuracy of incremental forming was outlined in our earlier study42. A schematic diagram of the VJM model of an industrial robot with a tool and tool holder is shown in Fig. 9. Here, each one-dimensional virtual spring represents the compliance of the actuated joint (\(\textbf k_i\)) where \(i=(1-6)\), while the compliance of the tool and tool holder are described by the spring located prior to them.

VJM-based stiffness model of industrial robot.
A set of auxiliary elasto-static experiments was carried out to identify robot stiffness properties (the stiffness coefficients of the robot virtual joints \(\textbfK_i\) used in VJM) following the procedure discussed in38. Identified joint stiffness is given in the Table 3. These coefficients compose a joint stiffness matrix
$$\beginaligned \textbf K_\theta = diag (\textbf K_i) \endaligned$$
(9)
where operator \(diag (\textbf K_i)\) creates stiffness matrix from the vector \(\textbf K_i\) with \(K_i\) components on the main diagonal, vector \(\textbf K_i\) composed of virtual joint compliance \(\textbf K_i\), \(i=1.. 6\).
Deviation due to robot compliance (\(\varveck_c\)) during the forming experiment was estimated using the following static relation
$$\beginaligned \Delta \textbf t = \varveck_c \textbf F \endaligned$$
(10)
where the compliance matrix \(\varveck_c\) is obtained by taking the inverse of the Cartesian stiffness matrix (Eq. 8), \(\textbf F\) was calculated based on the wrench data measurements from the force sensor (originally measured in its coordinate system) and related geometric transformations. Thereby, the force was transformed into the work object coordinate system of the robot according to the methodology presented in the supplementary information Appendix (A).
In the following section, we will use the above-described methodology to analyze the contributions of all inaccuracy factors in the roboforming process.
link


